Thursday, June 19, 2014

No pain...no gain


It is hard to believe that I haven't posted an update in two weeks only because the summer seems to be going so fast and this project has been moving at a snails pace.  Almost all of last two weeks was spent simply waiting.  I was waiting for my new mold to dry and waiting for the vibration table to be finished.


After my last post I began making a new smaller and better tray positive.  As is often the case making it a second time was much faster, easier and the results were better than the first go around so while I was bummed to have to re-make, it in the end I am happier.  Once I made the mold it needed time to dry which was just as well because it was taking a long time for the vibration table to get finished up.  Robby completed construction about a week and a half ago but running the electrical from the motor through the vari-speed power switch required the UCA electricians which took a few days of scheduling etc.  While I was getting anxious about the amount of time it was taking I was also aware of the fact that beggars can't be choosers...I can't weld with proficiency or do electrical work so I was relying on the skill and kindness of others.  I spent about half of that time at home working in the studio on other projects/pieces.  It hasn't felt efficient by any means and my ambitious goal of getting the trays finished by the end of summer isn't really within the realm of possibility but I still think I can accomplish getting the pieces done and the event organized within a year.  We shall see.  So below you will see the events of the past few days!


Here is the beautiful vibration table made by Robby Burton with the first mold strapped down to it!
Here it is from a birds eye view all filled and drying.
As of today I have cast the new mold twice.  The good news is that the vibration table is doing its job and allowing me to cast the entire tray solid with no gaps or air bubbles.  The bad news is that the tray is cracking in the mold.  It is clearly from the slip shrinking around the mold as it dries in there.  For those unfamiliar with the process, after you pour the slip the clay immediately begins to shrink as moisture is being absorbed from the object into the surrounding plaster mold.  As the moisture is removed from the slip the cast object begins to shrink.  If I can figure out a way to get the piece out of the mold before it shrinks too much it may not crack, but the mold won't open until it reaches a certain level of dryness so it is either a very fine balancing act to find the perfect timing or it will never work.  Another option may be to use  a different casting slip, one with more plasticity.  We are using a new casting slip recipe in our UCA slip casting class this coming semester so it seemed reasonable to mix some up and try it in the mold.  This would allow me to use the UCA slip mixer which holds 300 pounds of slip while classes are in session, in other words the students and I would be using the same slip (It is also allowing me and another student AJ Sawatzky to do some test runs on the studio recipe before we unleash it on the class in the fall).  We are using Andy Martin's cone 6 casting slip which casts quickly and is super white. Part of what allows it to cast quickly is that it is less plastic, having larger clay particle sizes in the mix, I hope this is also what is causing it to crack so quickly in the mold.

Here is the first cast.  The straight lines I cut to check thickness but the squiggly cracks all along the edges of the tray are from shrinking in the mold.
On a positive note the tray cast solid successfully and the piece looks relatively the same thickness throughout.
The first cast that you see above I left in the mold overnight, I figured this one would crack, but I had run out of time (I thought) before I had to be home to pick up the kids from school.  When I opened it this morning it was all cracked into pieces so I cast the mold again this time planning on getting it out of the mold as quickly as possible.  I started casting at 11am on the vibration table and refilled it every few minutes for 30 minutes until 11:30am.  After that I let it sit upright on the table for an hour (not vibrating...it is loud...the table vibrates at 93 decibels...thank you AJ and your phone app), then removed it and laid it on its side on a regular table to dry (this is in hopes of casting more trays on the vibration table while the others dry in the future).  An hour after that I was able to open the mold, much sooner than I had expected, the tray was still really soft AND still cracked.  

This is the second cast.  The clay is still pretty wet, like I could roll this whole thing up and squish it back together wet and the cracks are still there.
Cracking detail-Yuck!
I am very disappointed I fear that I may never get this to work while simultaneously thinking about how I might fix it in my next try!  I am going to cast this mold one more time using the Andy Martin casting slip and see if I can un-mold it an hour after I cast it.  If that doesn't work I am going to try using the casting slip I use at home which is very plastic (it is actually a throwing/hand-building clay body that I also use as a casting slip).  Hopefully the more plastic slip will have a little more stretch in it and won't crack so quickly.  We shall see.  I am not ready to give up yet, surely there is a solution here, I just need to keep thinking it through and working until I find it. If there are any really seasoned slip casters out there reading this blog let me know if you think what I am trying to do is impossible OR if you have any great suggestions to offer please do!!! I am all ears and would love the help!!!  For the rest you please just keep your fingers crossed for me! 

Monday, June 2, 2014

Disaster...yowza!

Week number four was a disaster.  I managed to finish the mold for the tray which I was excited about.  It took me a really long time because I am not able to spend a ton of hours here in Conway (I am working at UCA because there is so much more space and a 300 pound slip mixer!) because I have family obligations (two awesome little boys and one awesome husband) as well as studio obligations.  So it took me about a week to make the positive and cast the two halves of the mold.  Plus there was a lot of wait time as you will read below.

It is now Monday of week five and I have decided to make the entire positive over for a couple of reasons but I will let you read about last week first!

I started with a drawn template used to create some masonite forms cut on the scroll saw.  The masonite allowed me to have a perfectly smooth tray surface and limited the amount of plastiscene (oil clay) I would need to create the positive.  I needed the bumped separation part of the tray to be hollow and to be about the same thickness as the masonite (1/4") so I lined the masonite forms with tubing and started to apply plastiscene that had been rolled out to 1/4" over the tubing.  After I had finished putting the oil clay over the tubing I spent a long time trying to make it smooth and without undercuts, undercuts would act like little locks on the clay when cast causing the clay form to tear apart upon removal.  I probably spent two days trying to get it as perfect as I could...the better the positive the better the mold the less work you have to do on the clay when cast which is the goal...considering I need to cast this one hundred times a few days getting the mold as perfect as possible will save time fixing one hundred trays later!

After the tubing and plastiscene were in place and the pour gates added I coated the masonite in polyurethane to be sure it was watertight (if not the plaster would adhere to the porous wood) and let it dry.

 The next day I cast side one of the mold, thankfully Robby Burton, our studio tech. was around because I couldn't lift the plaster/water mixture up myself in a way that would allow me to pout it in any sort of controlled fashion (it was a little over 50 pounds).  The next day I came back, flipped the mold and removed the tubing so I could clean up the other side (what will be the back of the tray).


This revealed a challenge that I had not thought of, the removal of the tubing and the straight sides of the masonite left a very tight U shaped "tunnel", it was my intention to have a hollow channel (on the backside) separating the food areas of the tray but this one was going to be way too tight and narrow to successfully remove the clay cast and was to difficult to access to clean up the undercuts.  So I did one of the cardinal sins of slip casting...I removed the positive before I had cast the other side to I could bevel the edges of the masonite, when I returned it to the mold this allowed for a much more open U shape...more like a hammock... I think it will work.

So then I set to work smoothing the plastiscene, checking for undercuts and putting polyurethane on the backside of the masonite, this took another full day. After casting the second side and letting it cure overnight I was able to take the positive out (in pieces) and spent the morning cleaning up the inside and outside of the mold.  So far it all looked good, it was pretty clean in there, the positive seemed to come out with little signs of impending trouble and I thought I would just I wait until the mold was dry enough to do my first cast which should have been by the end of this week.  Then when I lifted this gigantic and very heavy mold into the drying box I wrenched my back!  The mold is so heavy and big I can really barely lift it.  This was the first sign of impending doom! I had to spend the next two days and then over the weekend at home because of my back!!! Yuck!!!  (As an aside, I spent the weekend thinking about my age and that I really need to reconsider the value of exercise time over studio time.  My body needs to keep up if I want to continue working in this physically labor intensive field...which I do!)

In the meantime Robby has almost finished welding a killer vibration table!  It looks really great, I think he is going to mount the motor on it soon!  At home with my back out of commission I did some color tests on my casting slip.  I want to try to cast the trays in an couple of different colors, I think it will look good, provide some variety amongst the trays, allow for consistent non-brushy color, (I have had some problems with uneven brushy application with some slips and I do not want that kind of mark making on these pieces) and limit the amount of time it would take apply two coats of slip to the front and back of one hundred trays!  I am going for light colors, something sort of subtle that will tie in well with the already existing decals.

As of today (Monday) I have decided to make all new positives.  When I got to school this morning I had spent a sleepless night thinking that the tray was really too big, the mold is so heavy and large I can barely move it myself and I don't really like the shape of the cup holding area.  The straw that broke the camels back was coming in this morning and trying to do a test cast.  The vibration table is not finished (Robby is on vacation) but I decided to give it a go anyway just to see what would happen, the first cast is always a waster/clean out cast anyway.  As I started pouring the mold all looked fine until I was about half full, then slip started pouring out of the bottom and all over the floor!


I managed to get it filled anyway but I am almost sure it is not going to work!  I think I need to pour with the tray on its side to allow gravity to work the slip to the bottom and throughout the mold but that puts a lot of pressure on those bottom seams.  I definitely need more straps to hold it together and I may need to pour it flat so gravity works in the molds favor instead of the slips favor.  Anyway it is very frustrating but I am learning through these failures.  I need to get over the fact that I feel so rushed for time and just slow down and take the disasters in stride and move on.  I'll let y'all know if the positive came out in any way close to the way it is supposed to look next week, and I will update you on the new smaller positives which I will thankfully be able to make much faster now that I know what I need to do and other progress by early next week!   Wish me luck!  I need it!

Wednesday, May 28, 2014

Time is flying!

I am already on my third week being out of school and working on this project!  Yikes, days are going by so fast!

A super brief overview of the project is this.  I am working with a great community group in Gould Arkansas, called the GCAC.  During phase one, I met with the group to ask if they would be interested in working with me on this project.

 We talked about what it was like living in a food desert, where the closest grocery store is over ten miles away and there is really no public transportation.  They shared their stories and concerns with me and then agreed to work as collaborators on the project.  I went down to Gould again with a student, Hunter Oden, and we gave disposable cameras to all of the GCAC members.  Hunter and I took photos that day too when we went on a tour of the community with the mayor and another GCAC community member (Rosie).  We gave the rest of the group about two weeks to take photos.  On our third return we picked up the cameras and brought them back to get the images developed. Hunter and I filtered through the hundreds of images taken by GCAC and us to pick out the ones that most fit the goals of the project, then began putting the images into photoshop and working them into decorative patterns that we could turn into decals and other images that we could use for silkscreen image.

During all of this I was also working on the first (failed... not awesome) prototype for the tableware.  Soon after all of that was completed I was too pregnant to continue so the project was put on hold. During the "holding" period I researched how I might make a thin solid cast tray and came upon the idea of using a concrete vibration table which the molds would sit on while they were being poured.  Slip is thixotropic which means that it stays liquid when agitated and "sets up" under static conditions.  In theory (keep your fingers crossed for me) I should be able to pour this very thin (1/4") undulating tray without "choking the mold" or in other words without the slip setting up in an area of the mold before the whole thing is filled therefore resulting in a partially cast tray.  A friend of mine asked me the other day why the clay tray won't crack in the mold over the curves as it shrinks in the mold while it is setting up...good question and I don't know?!?  I don't think it will because the curves of the tray are pretty shallow and domed...but it is always good to have another thing to fret over...keeps you on your toes!!!

So here we are.  I have had a number of contacts with people and organizations interested in helping with the fundraising component of the project which is really exciting.  It is also really overwhelming because I have to make the work first and it has to be good!  This is the first time the work I make is aligned with a commitment I have made with other people.  It feels like a lot of pressure but not (yet) in a bad way, although  do have nightly nightmares of all of the problems I might have and what I might do as a contingency plan!

So this week!  All of the material is here for the vibration table, which is what I will be using to create these solid cast trays, and now we (as in the royal we, because really our awesome technician Robby will be welding it for me) just need to put all of those parts together and we will have an industrial strength vibration table for a quarter of the cost. If it doesn't work for me at least the UCA art department will get an awesome vibration table so we can cast concrete!

In the meantime I am finishing up the positive for the tray, trying to get it as perfect as I can and trying to imagine all of the things that might go wrong (so I can fix it before it does).  I am purchasing the plaster tomorrow and so I hope I will get the mold made by the end of the week (we are going out of town for a few days) so that pushed my schedule a bit later into the week.


Tuesday, May 13, 2014

The NEW project - The Power of Ornament and the Politics of the Table

The project is not actually brand new.  I got a grant over two years ago and began to work on it...about a month later I found out I was pregnant with our second little munchkin! So I worked on phase one until I no longer could and then took a 14 month hiatus. Now that things on the home front have settled down a little bit I am off to the races again.  I completed and just received a second grant from my University Research Council  and am going to try to finish the making of this body of work in the next few months!

To save some typing I will cut and paste a brief abstract of the project from my proposal, try not to fall asleep!  Below that you will find a few images of my progress so far.

 Non-Technical summary

I am exploring the power of art to engage and inform community and to effect
change. I am creating a series of at least one hundred table settings that address the issue
of food deserts in a local Arkansas community through the use of form, imagery and
ornamentation. Food deserts are defined by the US Center for Disease Control as
”…areas characterized by poor access to healthy and affordable food…(which) may
contribute to social and spatial disparities in diet and diet-related health outcomes.” 1
Upon completion of the series I will use the settings as the centerpiece of a
community awareness and fundraising event highlighting food deserts in Arkansas. The
basic structure of event will be the advertising and selling of tickets which will cover the
cost of a meal and a table setting. There will be speakers presenting information about
food deserts and possible solutions applicable on a local and self-sustaining level. After
the meal the event participants will take home their table setting that will act as a visual
reminder of the problem of food deserts and food accessibility within the state and
hopefully keep the participant engaged in the issue.

All of the funds raised from the sale of the pieces will go towards finding a
solution to the food desert situation in Gould, AR, the community working in
collaboration with me on this project. I hesitate to state the exact use of the funds raised,
as I believe strongly that the community will best know how to spend the funds in order
to address the issue in their community. We also need to know how much money we
have to work with which is obviously tied to the success of the pieces and the event. Our
initial discussions have covered the possibility of using money raised to start a mobile
grocery store, a new development trending in the search to find sustainable and grassroots
solutions to the problem of food accessibility.

This URC grant will help support the completion of this proposed body of work
titled The Power of Ornament and the Politics of the Table. Primarily the grant will fund
the cost of printing custom designed decals which have been created from photographs
taken by Gould community members and will be used as a part of the ornamentation on
the table settings. The money will also be used to purchase of a small motor for a
vibration table that must be built and various other materials, listed in the budget section,
required to complete the project.

Julie Beaulac; Elizabeth Kristjansson, PhD; Steven Cummins, PhD,
“A Systematic Review of Food Deserts, 1966-2007” Preventing Chronic Disease: Public
Health Research, Practice and Policy, Volume 6: No. 3, July 2009,
http://www.cdc.gov/pcd/issues/2009/jul/08_0163.htm (accessed Feb. 21, 2012).
2


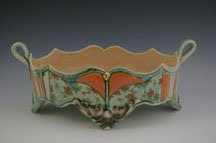
The image above is a prototype for the tableware.  I was trying to make it hollow cast but it failed miserably...and at about the same time it failed I had a baby!!!  So trying to figure out how to make this is task number one on my list of to do's to complete the project!  Below you can look at an example of a decal pattern made using images taken by the community members of Gould Arkansas and laid out in photoshop by a very talented young graphic designer Hunter Oden, now an alum of the UCA art department at the time of this project he was a student who worked with me to get this done.  Technology, especially Photoshop is my nemesis and it would have taken me far too many un-enjoyable hours to learn how to use it to create these decals.  Below that you can see an image, taken by Sam King a Gould community resident, that I will use for a silkscreen that will also be laid on the tableware.  And so there you have it my progress from the last grant.


So I am about to re-start this blog with a new project but since I never actually posted images of my final project installed back in 2010 at the Northern Clay Center titled "The Garden" I will do it here and now...three years later!   (If it is any consolation I did the installation while pregnant and now have one three year old and one 15 month old...they have been my most fantastic recent "projects" that I have been working on lately!

I should also let any students know who have looked over the earlier blog posts for this body of work...I used not a one of the pieces that you see in the posts of the work that I made at the Northern Clay Center in this final piece.  Every object you see in the final installation was made after my residency at home here in Arkansas.  I was on a steep learning curve in a short three month period (about equivalent to an academic semester)  in Minneapolis, teaching myself how to slip cast and trying to experiment with surfaces on forms that were complicated, so I took bits of what I learned from each of those pieces and re-made all of them so the final pieces were cohesive and as close to what I wanted as possible!

The panels are each about 10 feet high by 3 1/2 feet wide made entirely of glazed and slip cast objects.


This is a small detail of the surfaces applied to a few of the pieces.  The twigs had glaze, gold luster and one of a kind decals, the snow balls had glaze and slip trailing, the birds were straight glaze and the grasshoppers had glaze, underglaze pencil drawings and gold luster.


NOW...OFF TO THE NEXT BIG PROJECT!