After I unloaded my glaze firing at the beginning of last week I focused on spending the rest of the week making new pieces. I wanted to get a total of ten snowballs and ten bird sculptures and as of Sunday I accomplished that so all of the pieces, slip trailed and decorated went into the bisque on Tuesday! I broke a few pieces going in which was frustrating, they really need to be built on kiln shelves and then loaded without ever being picked up but I can't use that many shelves for so long here in a community studio. I should be able to repair most of them so I am trying not to be too upset. Here you can see a shot of all of the pieces post bisque that I will glaze at the beginning of next week!
This is a shot of the table full of bird sculptures and on the left snowball sculptures, There are fourteen on the table and there will be 20 made in total although they will not all work out the way I want. 
Here is a closer shot of the birds. A couple of them broke so hopefully the bisque repair will work again...that will be the second thing I do when I get back from home (The first will be to pour all of the grasshopper and twig molds).
 I am trying to stick to a strict schedule because I am leaving to go home on Friday until Tuesday and then really I only have three and a half more weeks to complete the work!. I needed to get those pieces bisqued and to start casting the other two seasons (Fall and Summer...twigs and grasshoppers)...the first of which I caste this Tuesday. I kept casting through Thursday but didn't get a lot done as I was having some problems with the molds, I was only able to put one piece together by tonight! However I got through my casting problem thanks to my friend Derek (he and Jeannie are my mold making lifeline) and a young guy here named Swen who knows some about slipcasting. So I have a bunch of parts stored until Tuesday when I return...I figure I only have that first week of September to caste fall and summer...then it will be all firing, glazing and decaling until the week before the end of the month! I can't believe how quickly it has gone by in terms of the work...yet it seems so long in terms of being away from home. So as always seems to be the case with ceramics no matter how consistently you work the #@!* always hits the fan at the end. So when I return I will be casting pieces, putting them together, glazing pieces (three more times once at cone 6, once at cone04 and again at cone 019), decaling and lustering, bisquing the hoppers and twings and all of the above firing again...gulp!
 Here is the studio in full prep for when I get back. On the left you see some of the leg molds (there are 2-3 legs in each mold) in the back there are the grasshopper molds.

Below is the right side of the studio, a table full of sculptures waiting to be glazed, and a bunch of twig molds at the bottom right.
 Here is the casting problem...The sunken in part of the legs is where suction was created becasue of poor venting. It is similar to trying to pour ketchup out of a full bottle, sometimes no matter how hard you shake the bottle it won't come out until you stick a knife up in there to create an air vent. You can't shake the mold like that or the piece would collapse, but the suction causes the still wet and thin skin of clay on the inside of the mold to pull in and collapse. Sometimes it would do this and no slip would pour out so the piece was solid (which is not what I want) or it would pour out and still collapse. So I had to drill some vent holes in the molds and make some of the pour gates bigger and it seems to have solved most of my problems!
 Below is the resulting first piece...to be honest I'm not sure how I feel about it...it's pretty funny looking which might be okay. I am trying to not judge it all too much right now...I need to finish a few, get them glazed and then see what I think.
 At the begining of the week I spent all of Tuesday and Wednesday working on the computer to try to get enough of a handle on Photoshop to generate some decals that I could send off. Anyone who knows anything about Photoshop would laugh to see the decals I made and to hear how long ot took me to make them...but I am getting there and feel like it is a big accomplishment to have gotten just this far. Luckily for me a nice woman named Natasha Poppe who teaches graphic design around here agreed to come over and give me a few pointers so I was able to finish some decals and sent them off to In Plain Sight...the decal making company which, it just so happens, is right here in Minneapolis! I was fortunate to have sent them when I did because they were running a big set of decals and put mine in with them so they were ready the next day! I went to pick them up and Brian Bolden...one of the two owners gave me a tour of their set up. It was pretty awesome, they were in the process of making a tile piece that must have been over 100 feet long and 20-30 feet tall. Each 12x12 tile had a section of a large photo from an image taken from the window of a moving car. The photo was broken up into these 12x12 sections and would be hung to create the full image. They also made their own artwork using the decal process. It looked easy, an old copier retrofitted with ceramic colorants printed out decals which were then coated with a layer of flux and run through a heat sealer (like a laminator). Then the decal is soaked, slid onto the tile and fired at a specific rate in a computer programmed kiln. The fact that it looked so easy is a testament to how finely tuned they have their operation. Anyway that was fun to see.
On the same day I picked up my vinyl cut patterns, which Natasha also helped me with, from the Fast Signs company in Downtown Minneapolis...the goal with this was to have some stencils cut without me having to cut them by hand. It is a start, they look good but not great...I think I am going to use them on my bisqued work...we will see how it goes.
On Thursday night a group of us went to see a show here at the Walker Arts Center called Dirt on Delight, an exhibition of ceramics. There was a huge stink about putting on a ceramics show at the Walker which is know as a cutting edge very contemporary art venue. I liked the show but at the same time had mixed feelings about a few of the pieces and the venue. I have been listening to a few of the pod cast lectures from the Museum of Contemporary Craft in Portland...my friend Heather Alexander told me about them...and they were definately in my mind when looking at the work within the context of the Walker. What kept coming to mind was a quote by Martin Puryear, a great artist who works primarily in wood, presented by Garth Clark a great ceramics scholar and gallery owner...Puryear stated (and I paraphrase) "an artist can create great work without great craft but a a craftsperson cannot create great craft without great skill". The jist of the lecture was about how the craft movement (not the makers themselves who are still vibrant and producing) is dying because of art envy...At the Walker there seemed to be both...work that was clearly very poorly crafted with the intention that the lack of skill was a part of the idea behind the art object and other pieces that were incredibly skillful and well crafted...I need to continue to think it through there were many pieces I loved and a few I struggled with. I think overall the idea was to include artists who don't normally use clay but have begun to include it in their process Beverly Semmes and Lucio Fontana, and clay artists (with great knowledge and skill with the material) Betty Woodman, Kathy Butterly, Ron Nagle who have always been exhibited in fine art venues and have never really been consideed "crafters"(as Clark called it). The ones I struggled with were those which were sorely lacking in craftsmanship...which makes sense as I am first and foremost a craftsperson ...Although there were some where craft was not a concern but also not a hinderance that I really responded to. Food for thought...I need to work on it all.
And here for all of you who read so far is a funny story, those of you who have been to art school will probably relate most directly and see what is so funny, those of you who aren't don't feel badly for me. On Tuesday as I was working and old professor of mine stopped by the clay center, it was great to see him, I liked him quite a bit when I was at SIUE as a special student (unclassified grad) and I respect his work...in fact I show it to my students as part of some assignment slide talks. Anyway he asked to see what I was working on...as he asked I started thinking...should I tell him it isn't finished yet, god what if it's terrible, what is he going to think and on and on. So he came in looked at the work for a few minutes and nodded...silently...he said nothing. I immediately regressed to an insecure 22 year old art student...it was crazy how quickly it happened. A student of mine commented on this when I posted it on Facebook, she said now I know how they felt when I critique their work but it is different...I've already gone through all of that, I'm 37, I've not been his student for 10 years and I've not been anyones student for 8, I get in shows, I have residencies, I make my living as a professional in the arts...and yet still all I wanted to do was to tell him I was working on it, it was in progress, it would get better. To those of you not in the arts don't feel bad for me...this is what it is like, and after years of school you feel just fine about it, and for those in the arts...stop laughing.
 I always believe in facing the worst first...like ripping off a bandaid or giving an oral presentation...just get it done and out of the way, so here is the ugliest! I took notes on my slipping and glazing...that green was NOT supposed to be that color! It is the result of an unfortunate reaction between the slip and the glaze. YIKES!
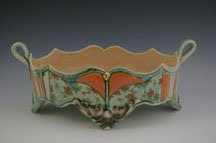
 While not perfect this one is closer to my goal for spring, overall it is too light and the pink slip on the bottom is not pink enough (it looks totally white in this image)
 Detail of the part I like most
  Here is my least favorite snowball set. I don't like the grid at all, but I do like the glaze combo on the bottom right just maybe not in that large of a section or broken up with decals.
 If you can see it themotteled section on the right is what I like, nice variation in the glaze but too much on this large of a section
  I like this one quite a bit. The slip pattern was outlined (with GA28 for my ceramics II students then glazed with LET clear and copper over the top) and made the slip trailing less rigid/sharp edged which I like.
  Detail...you can see how tight the slip remains on the dots to the left and how much runnier it looks on the curvilinear pattern on the right.


 Very happy with this ...closer to my minds vision
 Detail of bee pattern
 Non studio news is that I bought a wonderful Warren McKenzie piece, he is a well known potter who has worked with Bernard Leach, taught at the University of Minnesota, and was the professor of many great potters of out time. He has left a big mark on the clay community, the Arkansas Arts center just had a big retrospective of his work come through if any of you saw it. His work is crazy collectable everywhere but especially up here in Minnesota. He has a belief that work should be affordable for all people, and so he prices it VERY low...the result was that people would come to his pottery sales at his home buy the ENTIRE kiln and then re sell it all for a much higher price. Because of that there are all sorts of rules, like you can only buy one piece a month, you have to be present to purchase the work and so on and so forth. Now the Northern Clay Center is the only place in Minnesota where you can but his pieces. I just happened to be in the office in back when his work was brought in and got to chose the first piece from the lot. It is a beautiful lidded jar a really nice example of his work and one that I will be happy to bring to school and show students...of course I paid literally ten times the price he had put on the piece but I feel it is worth it and Bill agreed. The ten times money goes to help support the clay center so it seems doubly worth it. Here it is...like most pots you need to experience it in real life to truly appreciate it, but it is a really nice one!


 Detail of the big set...the hot pink line is sharpie marker, it will burn out in the firing, I thought I wanted to put something there but decided against it.