Tuesday I poured scrap slip into the cleaned molds to be sure they were free of plaster, plasticene and excess mold soap (and got my haircut...I think it looks good). I also used the scrap to cast a few extra forms so I could do some initial experimenting on the forms without wasting my good slip. I was sad to learn that Continental Clay was out of my claybody so I will have to wait to make more casting slip until next week.
Wednesday was a disaster, I spent the morning mixing and pouring the good slip into the molds...I had a feeling it was too thick but ignored it because I had measured its specific gravity a few days before and it was good, well I should have followed my gut. Usually after I pour the slip into the molds which in total takes about 30 -45 minutes because I am filling about 10-20 at once, the slip needs to sit in there for 20-40 minutes depending in the size of the mold (meaning I can pour out the first one right after I finish filling the last one) to get the appropriate thickness for the wall of the piece. Well the slip was WAY too thick and wouldn't pour back out of the molds, it was clogging the pour spout and I was trying to dig it out, it was a mess and getting everywhere when I decided to scrap the whole effort. I decided to unmold the pieces so I could reuse the slip but to do this I had to unmold forms that were 1. full of liquid slip 2. not dry or strong enough to really retain said slip. So to get a mental image think of a water balloon totally full of a liquid that is runny but thick and sticky...maybe like motor oil or Caro syrup... now imagine the balloon is made of something more like oh I don't know...totally soft thin clay...now to get back to reality lets say you are a visiting artist who is getting paid to make this work and be a "professional" and just as you are lifting this squashy ball of liquid slip out of a mold, it bursts all over you, your hands and your studio and your ears hear..."and this is Liz Smith she is our McKnight grant recipient..." A tour of 20 people standing in the doorway of my studio space and slip in pouring out between my fingers and down my apron into a pool on my feet as I hold an exploded and deflated cricket body in my hands...yeah... really... that's what happened, sorry I don't have any pictures. Thursday afternoon I fixed my slip following my awesome exhibition of artistic skill and technical prowess (and about twenty minutes of clean up) and spent Thursday and Friday morning casting pieces and putting them together.
Below: Box of balls and flowers

Below: Balls, birds and flowers assembled equals four sculptures. Details follow


Below: Tip - your deflocculated clay mixed with a combination of epsom salts and water equals "slip goop" no scoring and slipping necessary...it seems to be pretty strong so far! If you want the recipe e-mail me.
 So I have four objects put together from my good clay and two from the test clay, now the really hard part begins. How to start applying pattern and decoration to these complicated and undulating forms? I started trying to carve a pattern on a test form on Thursday evening...it was a disaster, the "snowball" forms are the simplest of all of my planned sculptures and I couldn't get a straight line when I went over one sphere to the next. Then I borrowed a tip from Kip O'Krongly, the woman here whose work I admire, she uses thin plastic tablecloth to use as cut stencils, they are softer than the paper stencils I use and therefore bend more easily over a curved surface however it still wasn't what I needed, they didn't seem to stick enough to the form to create a clean line. I went home that evening discouraged and sure I would never be able to complete this project with any success. The next day I went to the studio and decided I would just "play" with my second test form and try not to care that what I was making (and what everyone was seeing) was a mess...all of my test ideas on a single piece (I only had this last test piece) it was a monstrosity by the end of the day but I had worked through some ideas regarding how to apply pattern, use the plastic stencils (they are much more adhesive when wet)
 Below: Stencil cut from plastic picninc tablecloth (4th of July theme)

Below: Two shots of cutting out a different stencil


Below: Two shots of applying the stencil then coating it with colored slip and following slip trailing the outline of the stenciled pattern (ignore the color choice this is just a test)

 and to test slip trailing with a variety of slip mixes and application tools (slip trailing is similiar to squeezing mustard on a hot dog, but with slip instead of mustard, with a much finer tipped squeeze bottle and hopefully with a little more skill and intention).
 Below: Stencil, slip, trailing and carving all on a test piece.
 So after Friday I felt better but still overwhelmed about how to begin on Saturday when I was going to start on my "real" pieces. The forms are so complicated...how/where to put on color or pattern first? I went home and continued to read a book I have started a couple of times but am really getting into while I'm here. "Ornament: A Modern Perspective" by Robert Trilling and there I found the answer to my question of where to start. He talks about ornament as a mixture of pattern (repeated form and shapes in a structured layout) and motifs (visual imagery often laid over the pattern in a way that sometimes does and sometimes does not follow the general direction of the pattern) it is a mixture of creating control and chaos through layering and design in a way that again may or may not adhere to the form to which the ornament has been applied (think vase, armoir, upholstry)...here I read about what I have been doing all along with my pots. Taking a form that is curved, often with no discernible front or back, breaking it up into segments, applying pattern and then applying motifs. But with this work I want the visual result to be more intense, more overwhelming and complicated. So I have begun by breaking up the spherical forms into sections of color, for whatever reason this makes it much easier for me to "see" where and how to apply more overlapping pattern and from there it will build up and up, layer over layer.
 Below: Shots of the three "snowball" pieces and where I will start from tomorrow


Below: A detail of what I am thinking of as one option, carving into the form.
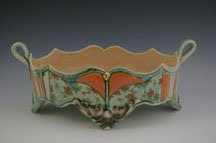
 Now tonight I am worrying about the type of patterns I will choose for winter...? I have included one of a number of images here that I am using for inspiration but most of them, as this one is, are created from plant and flower motifs which is not what I want to use for my snowball forms...I don't know...I need to work on it.
 Below: Pretend this has been properly footnoted and don't show Prof. Morales my blog! An example of an old wallpaper pattern, I love the overlapping of motif over pattern.

One of the great things about living in this part of Minneapolis is (as I mentioned before) the large Somali population. Many of the Somali women wear traditional dress which is called (I think, a hajib...forgive me if I am mistaken), they are Muslim and many are fully covered in fabric from head to toe...and the fabric!...I would love to ask some of them about the aesthetic that goes into their fabric choices, all I can say is that it can be dazzeling. The women who choose to wear patterned fabric often put together combinations that are outrageously vibrant in color choice and absolutely eye popping in pattern combination. Tonight when I came home there was a group of about ten women walking towards me...I tried to take their picture as a group but it does not do them justice, I did ask one of the women if I could take her picture and she consented...her outfit is a stunning combination. The group was so overwhelming as a mass of moving pattern and color! my eyes were overwhelmed! With this kind of inspiration around me every day I should have no problem completing this project!
Below: The backs of the group of Somali women, you can barely get a sense of the riot of color and pattern.
 Below: Look at this beautiful outfit! I love that she is wearing two pieces of green fabric with different patterns (one is over her shoulder) and I think the white ruffle at her feet is a remarkable detail. It should also be noted that the white spots of fabric on her headscarf were actually silver metallic sequins!
 I will be going home to Little Rock on Friday until next Tuesday morning...I need to get a lot done before I leave but I am very happy to be able to see Bill and the animals and be home for a bit. So until next week...!
 I was also able to cast, using scrap slip, two of the grasshoppers I have been working on...no legs yet because those molds are still wet. I have to wait for the molds to dry out (I have fans on them to speed things up) otherwise the water will not absorb from the slip into the plaster which is how the skin (wall) of the clay piece is formed. When I first cast both grasshoppers yesterday they ripped as they came out of the molds which sent me into a moment (or entire sleepless night) of panic. I was worried that I had made all of my molds wrong (I have probably made 14 molds so far...gone through over 300 pounds of plaster!) so you can understand my concern. Thankfully the next day I recast them and both came out beautifully. It is typical for a first cast, which is always a scrap cast to clean out the mold of any remaining mold release and bits of plaster, to not come out right. Molds become "seasoned" with use, I knew this but it did not keep me from worrying. I had also not let the clay sit in the mold long enough before I poured out the excess slip so my walls weren't thick enough AND I had tried to pop them out of the molds too quickly so the clay was still too wet . Each piece (and mold) has its own timing needs depending on the molds wall thickness, how damp the mold is (if you are making multiple casts) and how thick you want the clay piece to be. Long story short at least two of the molds work which is promising.
  Other than that not much else went on in my studio. On Friday there was an opening in the gallery featuring the artists of the Northern Clay Center. It is a nice exhibition as it showcases a range of work from instructors to studio artists to work from the kids classes. Studio artists are what the people who are renting permanent work space are called here. There is a range of types of spaces from a shelf rental in a community space to small and large individual or shared private studio spaces. There is a long waiting list to get into the private and semi private studio spaces and as I understand it there is also a jurying process involved. The studio artists spaces are completely seperate from the four large rooms where classes are taught. Some of the studio artists work is very accomplished...post graduate school or similarly experienced while others are seriously commited hobbyists who also make nice work. At the moment the work of Kip O'Krongly is my favorite, she handbuilds functional tableware out of lowfire red earthenware...I plan on getting some of her work before I leave!
  That same night two artists, Hide (pronounced He-Day) Sidohara and Linda Cordell came by (from upstate New York...does that count as "coming by"?) to drop off some of Hide's work. Hide was a McKnight recipient two years ago and Linda went to LSU, graduating a year or two before I arrived. If you are interested you should look up their work, just google their name and ceramics, it is very impressive! I hope to bring them both in as visiting artists to UCA in the near future. Linda is also very good friends with one of my best friends and so because of all those connections we went out to dinner together. It was really nice and great to get a chance to talk with them. I haven't had conversation that long with anyone in person since I have been here!


 Finally last but not least, this is Milo, he is the official Northern Clay Center cat. He lives in and around the studio but is not allowed in the gallery. Sometimes in the morning if I am the first one there he comes and lies on my work table.
 So hopefully next weeks post will have new and exciting clay images to show you and from then on I will be in a frenzy of making sculpture and working on decoration techniques and ideas. I am looking forward to it!


 Below: I pour the plaster through a sieve which removes any dry plaster particles and diminishes the chance of having bubbles in the mold
 I am heating the plasticene under a lamp so it is easy to work with and then shaping it like clay with my hands and some rubber tipped tools. The first grasshopper is a little over 12 inches long (it will shrink about 10%-15% once fired) After getting the form done (which took two days) I spent a half a day trying to be sure there were no undercuts on the piece (these would not allow the clay positive to be removed from the mold without tearing) then I made the mold. It is a three part mold with the seam running down the middle of the body on top and bottom, and the third piece for the front of the "face". The first mold took me all day to make and it weigh 50 pounds!, I made another so I can hopefully be sure that at least one if not both of them work, for the second I diminished a bit of the grasshoppers wing texture so they will be a little different from one another. That mold weighed 50 pounds too! I need to start lifting weights as well as taking yoga if I want to keep this up!
  It is my hope that I will have all of the molds completed in about two weeks so I will be done with plaster and can begin casting all of the molds in clay. Once this happens I will be casting all of the molds at least once a day so production will be quick. The tricky thing is you can't know that a mold "works" until you have made a clay caste, and you can't make that caste until the mold is dry (plaster is a mixture of about 1 part water to 3 parts plaster so a 50ish pound mold has about 16 quarts of water in it that needs to evaporate). I am (of course) hoping the large grasshoppers work, especially since I have deconstructed the plasticene model and would have to completely re-make it if the molds didn't work which would be a real pain.